Login Using OAuth 2.0 Authentication
Note that this configuration option is not yet supported and the test endpoint button will not work.
The OAuth Login method is useful when you need to send a one-time login request to obtain temporary credentials for authentication of all the other API requests. A sample OAuth Login authentication looks like this:
{
    "api": {
        ...,
        "authentication": {
            "type": "oauth20.login",
            "loginRequest": {
                "endpoint": "login",
                "method": "GET",
                "headers": {
                    "X-Login": "JohnDoe",
                    "X-Password": "TopSecret"
                }
            },
            "apiRequest": {
                "headers": {
                    "X-ApiToken": {
                        "response": "authorization.token"
                    }
                }
            }
        }
    },
    "config": {
        ...
    }
}
Configuration Parameters
The configuration parameters are identical to the Login method. The difference, however, is in the function context. The login request is assumed to require the OAuth2 authorization and its response must be in JSON format (plaintext is not supported).
Examples
The following examples demonstrate how to use OAuth with a basic login request and Google API in Generic Extractor.
Basic Configuration
The following configuration shows how to set up an OAuth login request:
{
    "parameters": {
        "api": {
            "baseUrl": "http://mock-server:80/105-oauth2-login/",
            "authentication": {
                "type": "oauth20.login",
                "loginRequest": {
                    "endpoint": "token",
                    "headers": {
                        "X-Refresh-Token": {
                            "user": "refresh_token"
                        },
                        "X-App-Key": {
                            "consumer": "client_id"
                        }
                    }
                },
                "apiRequest": {
                    "headers": {
                        "X-Access-Token": {
                            "response": "credentials.access_token"
                        }
                    }
                }
            }
        },
        "config": {
            "outputBucket": "mock-server",
            "jobs": [
                {
                    "endpoint": "users",
                    "dataType": "users"
                }
            ]
        }
    },
    "authorization": {
        "oauth_api": {
            "credentials": {
                "#data": "{\"status\": \"ok\",\"refresh_token\": \"1234abcd5678efgh\"}",
                "appKey": "someId",
                "#appSecret": "clientSecret"
            }
        }
    }
}
First, an OAuth login is negotiated. The result of this authentication is a response from the API (inserted into
the authorization.oauth_api.credentials.#data property):
{
    "status": "ok",
    "refresh_token": "1234abcd5678efgh"
}
This is sent to the /token endpoint with the following headers:
X-Refresh-Token: 1234abcd5678efgh
X-App-Key: someId
This API call then returns the following response:
{
	"credentials": {
		"validUntil": "2017-10-04 12:45:09",
		"access_token": "mkoijn098uhbygv"
	}
}
From that, the value of the credentials.access_token property is taken, inserted into the X-Access-Token header
and sent to other API requests (/users).
See example [EX105].
Google API Configuration
The following example shows how to set up the OAuth authentication for Google APIs. The access token is refreshed with each API call.
Generate access tokens
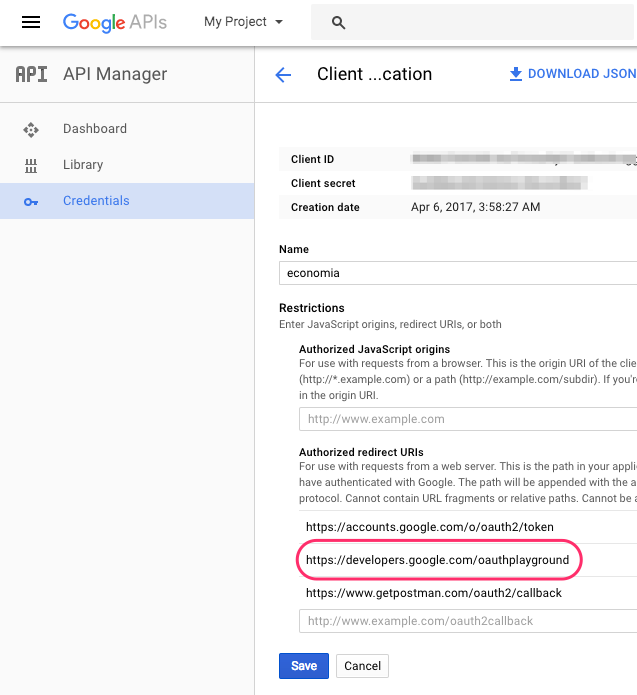
First, visit Google API Console to obtain OAuth 2.0 credentials, such as a Client ID and Client secret.
Add https://developers.google.com/oauthplayground to Authorized redirect URIs:
Then, generate access and refresh tokens using Google OAuth 2.0 Playground.
Provide your Client ID and Client secret in the settings of OAuth 2.0 Playground:
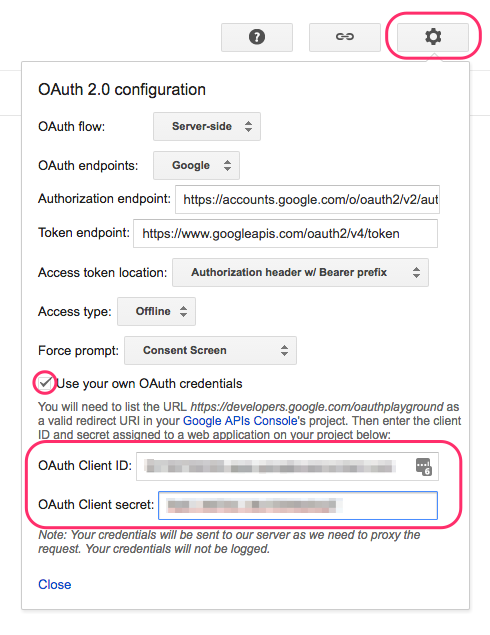
Make sure the Offline Access option is checked and close the settings dialog.
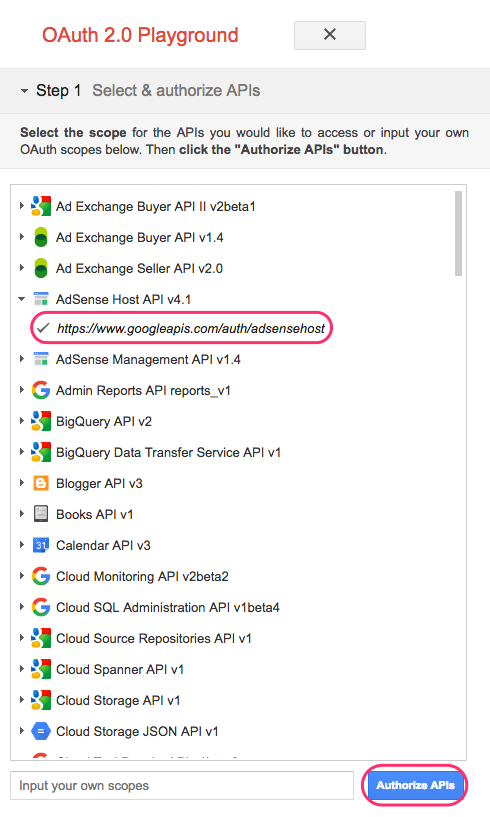
On the left side, choose which scopes you would like to authorize and click on Authorize APIs.
Then exchange the authorization code for tokens:
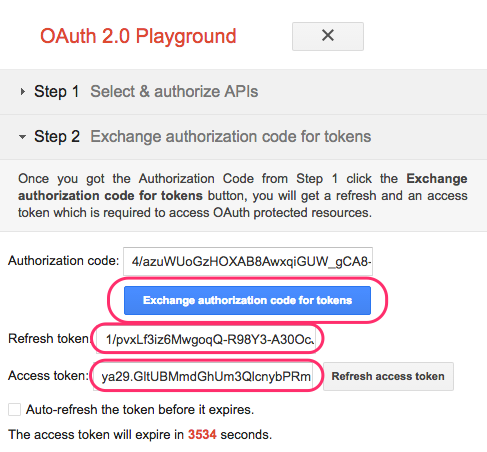
Use the generated tokens in the Generic Extractor configuration.
Configuration
Paste the JSON response with the generated access and refresh tokens as a string under the #data key in
authorization.oauth_api.credentials.
Escape double quotes " in the JSON response and preferably remove newlines too, so it looks like this:
{\"access_token\": \"MY_ACCESS_TOKEN\",\"refresh_token\": \"MY_REFRESH_TOKEN\"}
Here is a complete configuration example for AdSense:
{
  "parameters": {
    "api": {
      "baseUrl": "https://www.googleapis.com",
      "authentication": {
        "type": "oauth20.login",
        "loginRequest": {
          "endpoint": "/oauth2/v4/token",
          "method": "FORM",
          "headers": {
            "Content-Type": "application/x-www-form-urlencoded"
          },
          "params": {
            "client_id": {
              "consumer": "client_id"
            },
            "client_secret": {
              "consumer": "client_secret"
            },
            "refresh_token": {
              "user": "refresh_token"
            },
            "grant_type": "refresh_token"
          }
        },
        "apiRequest": {
          "query": {
            "access_token": {
                "response": "access_token"
            }
          }
        }
      }
    },
    "config": {
      "debug": true,
      "outputBucket": "adsense",
      "jobs": [
        {
          "endpoint": "/adsense/v1.4/reports/",
          "dataField": "rows",
          "dataType": "rows"
        }
      ]
    }
  },
  "authorization": {
    "oauth_api": {
      "credentials": {
        "#data": "{\"access_token\": \"MY_ACCESS_TOKEN\",\"refresh_token\": \"MY_REFRESH_TOKEN\"}",
        "appKey": "MY_CLIENT_ID",
        "#appSecret": "MY_CLIENT_SECRET"
      }
    }
  }
}
See example [EX114].