Deployment
If you created your component according to the tutorial, you already have a deployment pipeline set up. This article explains in more detail how the pipeline works. It also describes alternative set ups. Assuming your component is similar to the example component created in the tutorial, you see the following behavior:
- Every commit & push to the git repository triggers a build.
- Every new tag pushes the built image into our AWS ECR registry.
- Every normal version tag (x.y.z) updates the image tag in the Developer Portal and subsequently makes the image available in Keboola.
We highly recommend the above setup (or a similar one) as it imposes very little extra work on the developer, yet it deploys new versions of the component in a controlled and traceable manner.
How It Works
The following text explains the default setup in detail so that you know what to do if something breaks or how to set up the pipeline manually.
Integration
The first step is the integration between GitHub and Travis. This is best set from the Travis side by enabling the repository:
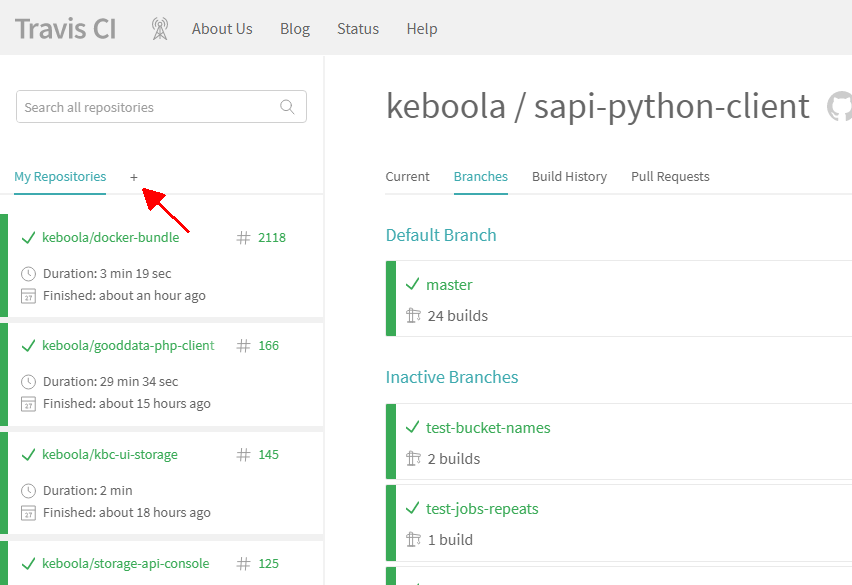
Enable builds for the repository. If you don’t see the repository, use the Sync account button:
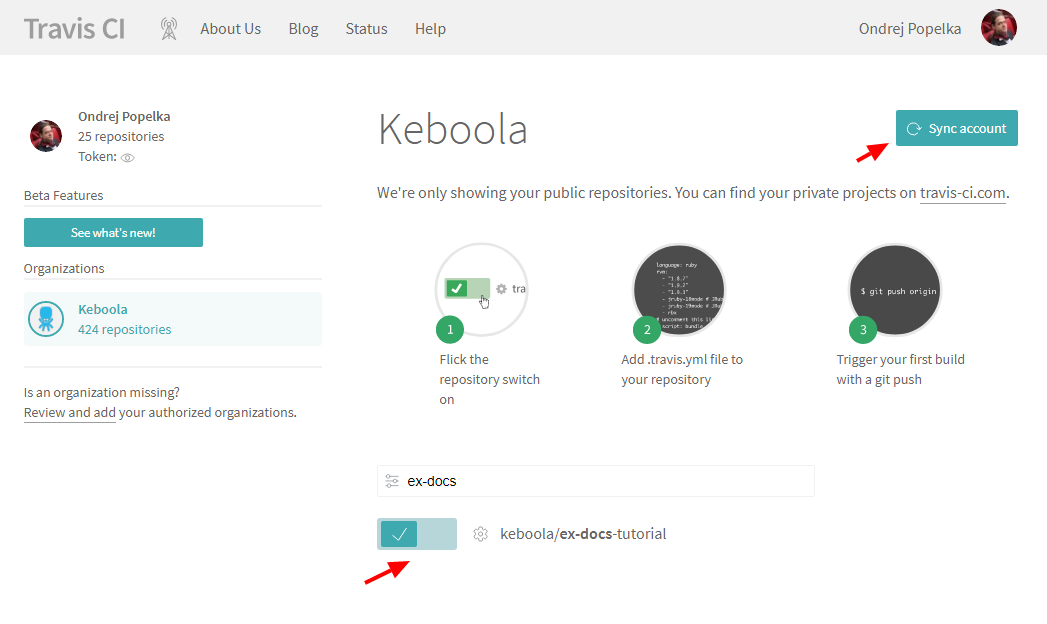
This causes Travis to trigger a build on every GitHub commit & push.
Build Setting
What the Travis build does is defined in the
.travis.yml file in
your repository. You should have something similar to this:
sudo: required
language: bash
services:
  - docker

before_script:
  - export APP_IMAGE=keboola-component
  - docker build . --tag=$APP_IMAGE

after_success:
  - docker images

deploy:
  provider: script
  skip_cleanup: true
  script: ./deploy.sh
  on:
    tags: true
The .travis.yml file offers a vast number of configuration options.
We only need a few of them though. The options sudo, language and services define that all we need is Docker.
The before_script section executes a single shell command which
builds the image and tags it keboola-component. The
tag is completely arbitrary at this moment, but we’ll need it later. The after_success section simply lists the
built images in the log.
The deploy section defines when a deploy will be triggered (on tags) and what should be done deploy.sh. This means that
when Travis encounters a tagged commit, it triggers the deploy.sh shell script (after everything else was done).
Deploy Script
In your repository, you should have a deploy script similar to the one below:
#!/bin/bash
set -e

# Obtain the component repository and log in
docker pull quay.io/keboola/developer-portal-cli-v2:latest
export REPOSITORY=`docker run --rm  \
    -e KBC_DEVELOPERPORTAL_USERNAME \
    -e KBC_DEVELOPERPORTAL_PASSWORD \
    quay.io/keboola/developer-portal-cli-v2:latest \
    ecr:get-repository ${KBC_DEVELOPERPORTAL_VENDOR} ${KBC_DEVELOPERPORTAL_APP}`
eval $(docker run --rm \
    -e KBC_DEVELOPERPORTAL_USERNAME \
    -e KBC_DEVELOPERPORTAL_PASSWORD \
    quay.io/keboola/developer-portal-cli-v2:latest \
    ecr:get-login ${KBC_DEVELOPERPORTAL_VENDOR} ${KBC_DEVELOPERPORTAL_APP})

# Push to the repository
docker tag ${APP_IMAGE}:latest ${REPOSITORY}:${TRAVIS_TAG}
docker tag ${APP_IMAGE}:latest ${REPOSITORY}:latest
docker push ${REPOSITORY}:${TRAVIS_TAG}
docker push ${REPOSITORY}:latest

# Update the tag in Keboola Developer Portal -> Deploy to Keboola
if echo ${TRAVIS_TAG} | grep -c '^v\?[0-9]\+\.[0-9]\+\.[0-9]\+$'
then
    docker run --rm \
        -e KBC_DEVELOPERPORTAL_USERNAME \
        -e KBC_DEVELOPERPORTAL_PASSWORD \
        quay.io/keboola/developer-portal-cli-v2:latest \
        update-app-repository ${KBC_DEVELOPERPORTAL_VENDOR} ${KBC_DEVELOPERPORTAL_APP} ${TRAVIS_TAG} ecr ${REPOSITORY}
else
    echo "Skipping deployment to KBC, tag ${TRAVIS_TAG} is not allowed."
fi
The script uses our Developer Portal CLI tool to communicate with
the Developer Portal API. The tool itself is provided as a Docker
image quay.io/keboola/developer-portal-cli-v2. The entire script uses the following environment variables:
KBC_DEVELOPERPORTAL_USERNAME– Service account user nameKBC_DEVELOPERPORTAL_PASSWORD– Service account passwordKBC_DEVELOPERPORTAL_VENDOR– Vendor IDKBC_DEVELOPERPORTAL_APP– Component ID
You can read more about using the Developer Portal CLI in the chapter about running components.
The deploy script first pulls the image and then calls the ecr:get-repository command (while passing in the
KBC_DEVELOPERPORTAL_USERNAME and KBC_DEVELOPERPORTAL_PASSWORD variables). The result of that command is stored in the REPOSITORY
variable. After that the ecr:get-login command is called; it returns
a command line to authorize against our AWS ECR registry (e.g docker login -u AWS -p ey...ODAzOH0=
147946154733.dkr.ecr.us-east-1.amazonaws.com). The return value is evaled – i.e., the login command is executed.
Then there are two docker tag and docker push commands which tag the image build as keboola-component with the latest tag
and the git commit tag (stored in TRAVIS_TAG variable). Push the two resulting images into the AWS ECR registry.
The last part of the script begins with a check that the commit tag (TRAVIS_TAG) is a normal version tag
(x.y.z). If not, the component is not updated in the Developer Portal. However, at this stage the image was already pushed into the registry
so it can be used by running it explicitly. If the git tag
is a normal version tag, the component is updated in the Developer Portal using the update-app-repository command.
This means that the new version of the component is immediately deployed into Keboola. Keep in mind that it takes a couple of minutes
to propagate the change to all Keboola instances.
When modifying the deploy script, make sure the deploy.sh file line ending is set to Unix (LF). Also make sure that the file is executable,
i.e., by executing git update-index --chmod=+x deploy.sh. If the script is not executable, you’ll get the following error message:
Script failed with status 127
or
bash: ./deploy.sh: Permission denied
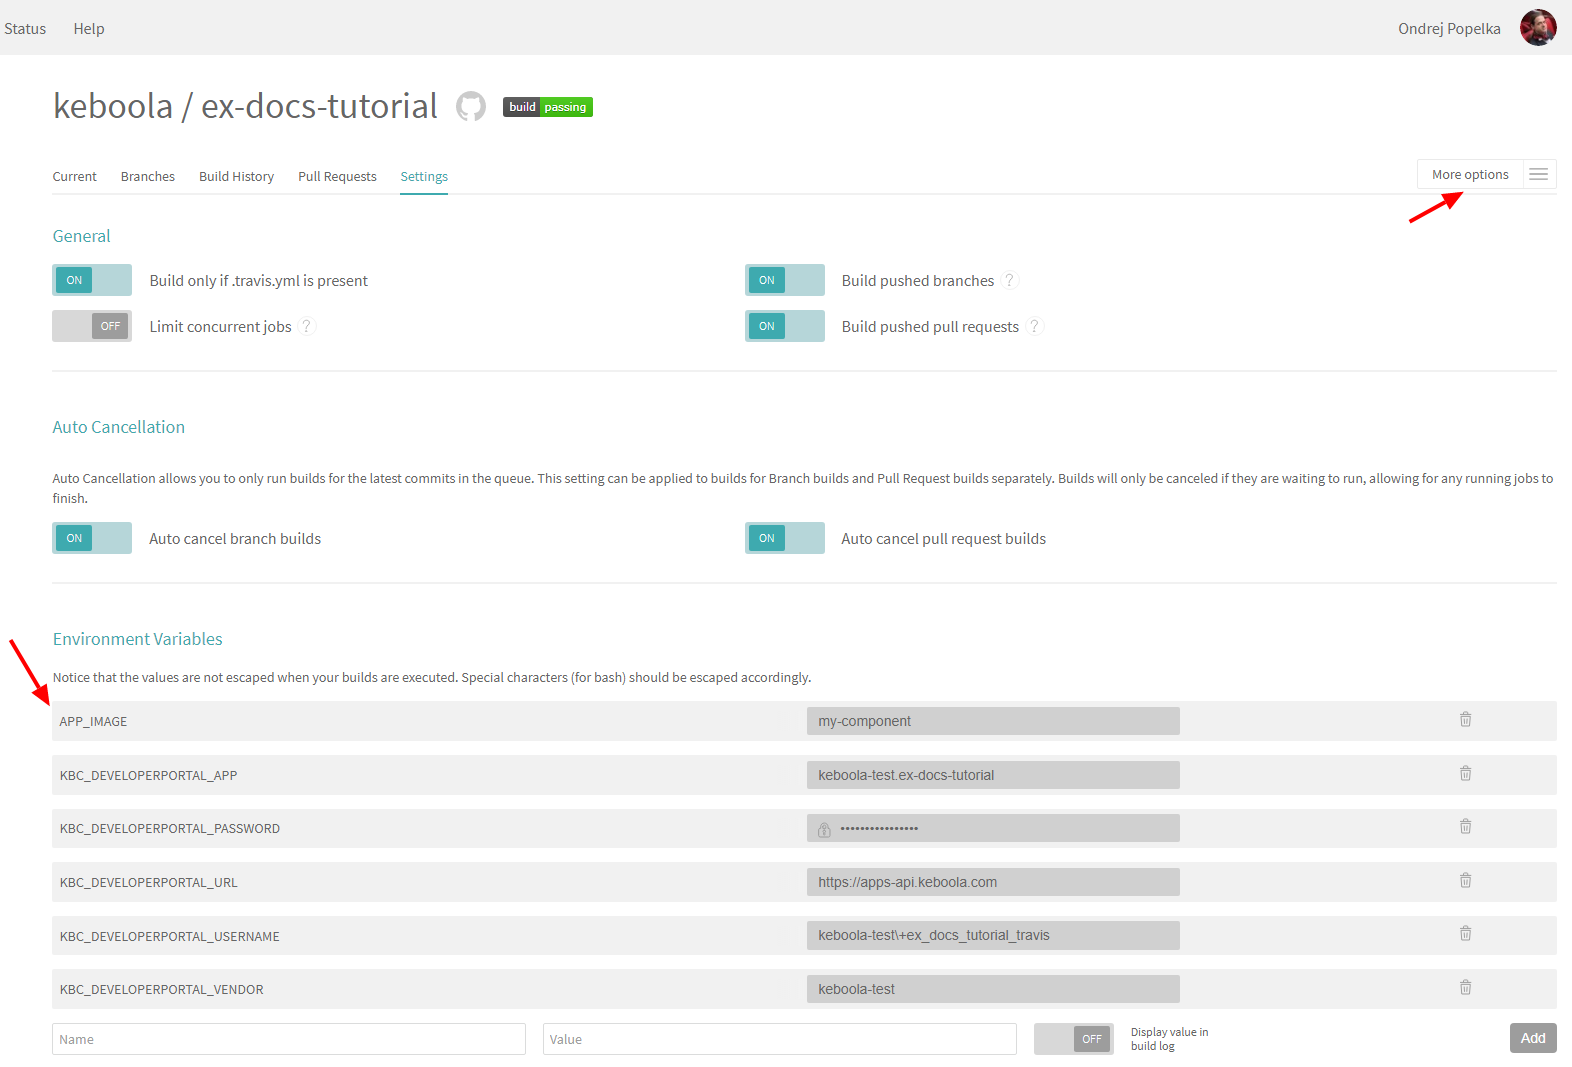
Deploy Configuration
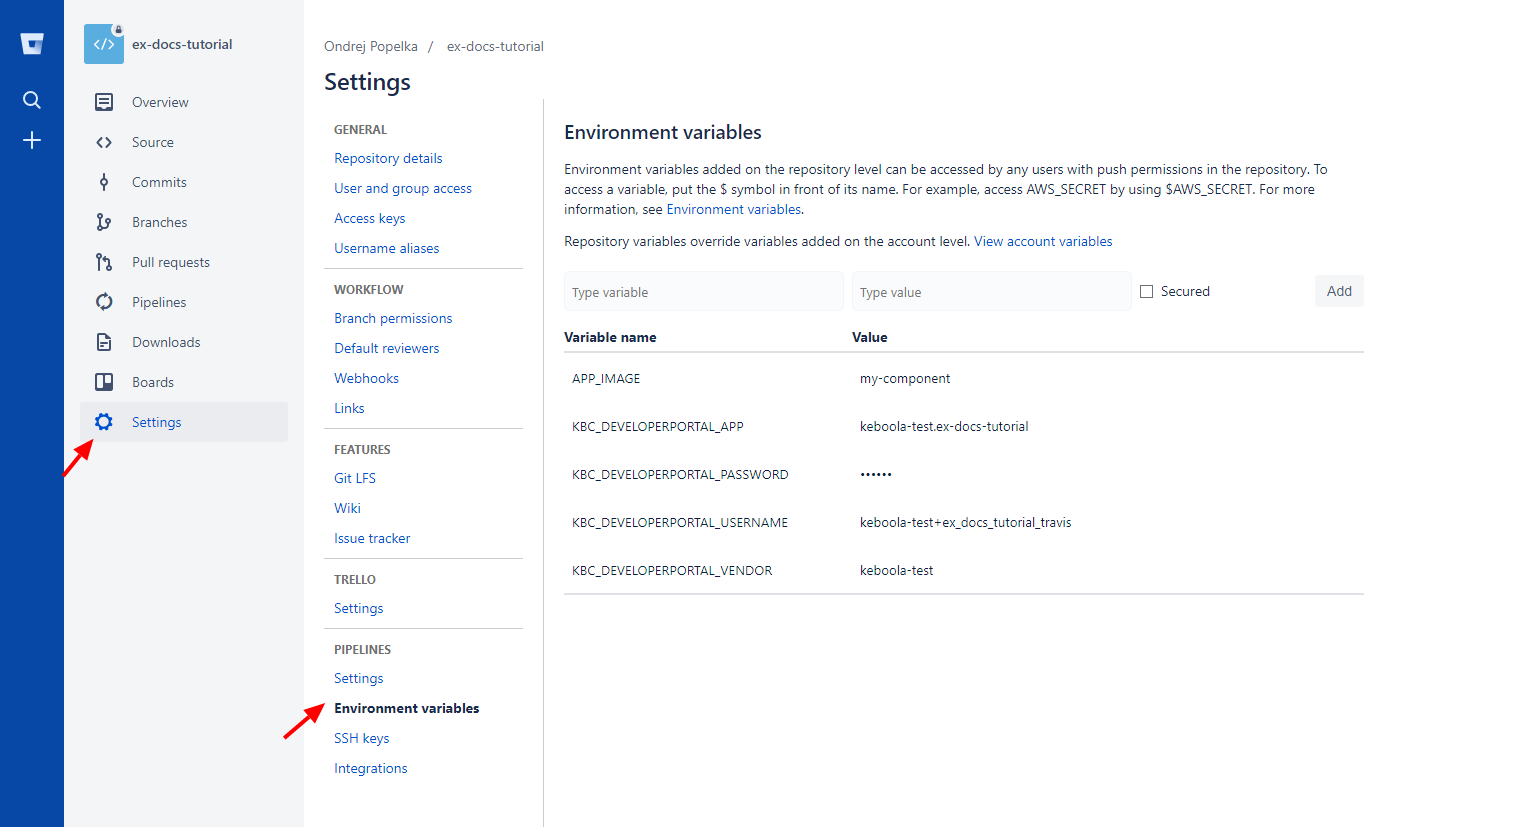
The above deploy script requires four environment variables to be set. Set the following environment variables in the repository configuration:
KBC_DEVELOPERPORTAL_APPthe component ID – e.g.:keboola-test.ex-docs-tutorialKBC_DEVELOPERPORTAL_PASSWORDwith the Service Account passwordKBC_DEVELOPERPORTAL_USERNAMEwith the Service Account loginKBC_DEVELOPERPORTAL_VENDORwith the vendor of the component – e.g.:keboola-test
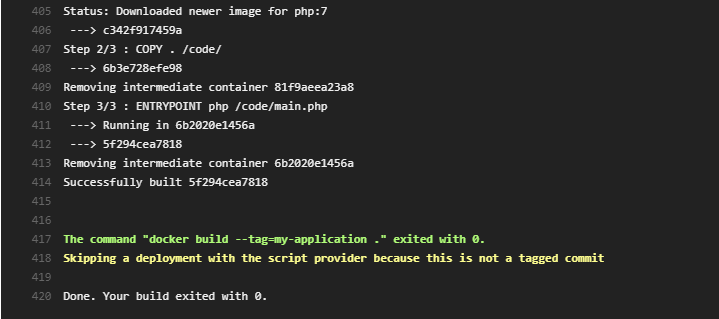
Trigger Build
Commit and push anything to the repository to trigger the build. In Travis, you should see an output similar to this:
Now push a tag to the repository (we recommend using Semantic Versioning):
git tag 0.0.6
git push origin --tags
In Travis, you should see an output similar to this:
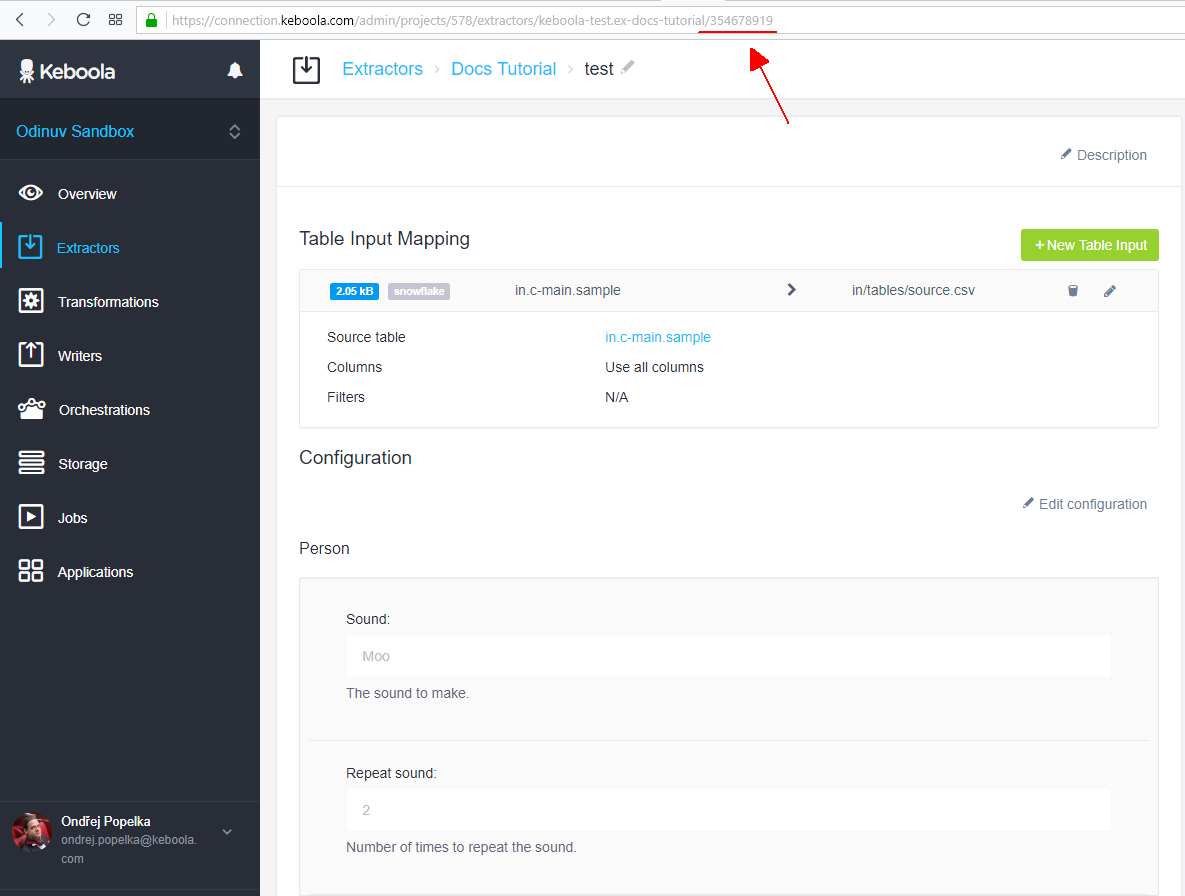
If no errors occurred, the component is now deployed into Keboola. In the Developer Portal, you can verify that the component repository and tag were automatically set:

The component is now runnable in Keboola. You can view all settings in our example repository. You can also review Travis Configuration.
Note that it takes up to 5 minutes before the changes in the Developer Portal propagate to all Keboola instances in all regions.
Bitbucket Integration
The development tutorial as well as the above description assume you’re using Travis CI Service for building and deploying the image. Travis integrates very well with GitHub, but not with Bitbucket. However, Bitbucket has its own continuous integration service – Bitbucket Pipelines.
You have to enable Bitbucket Pipelines in your repository:
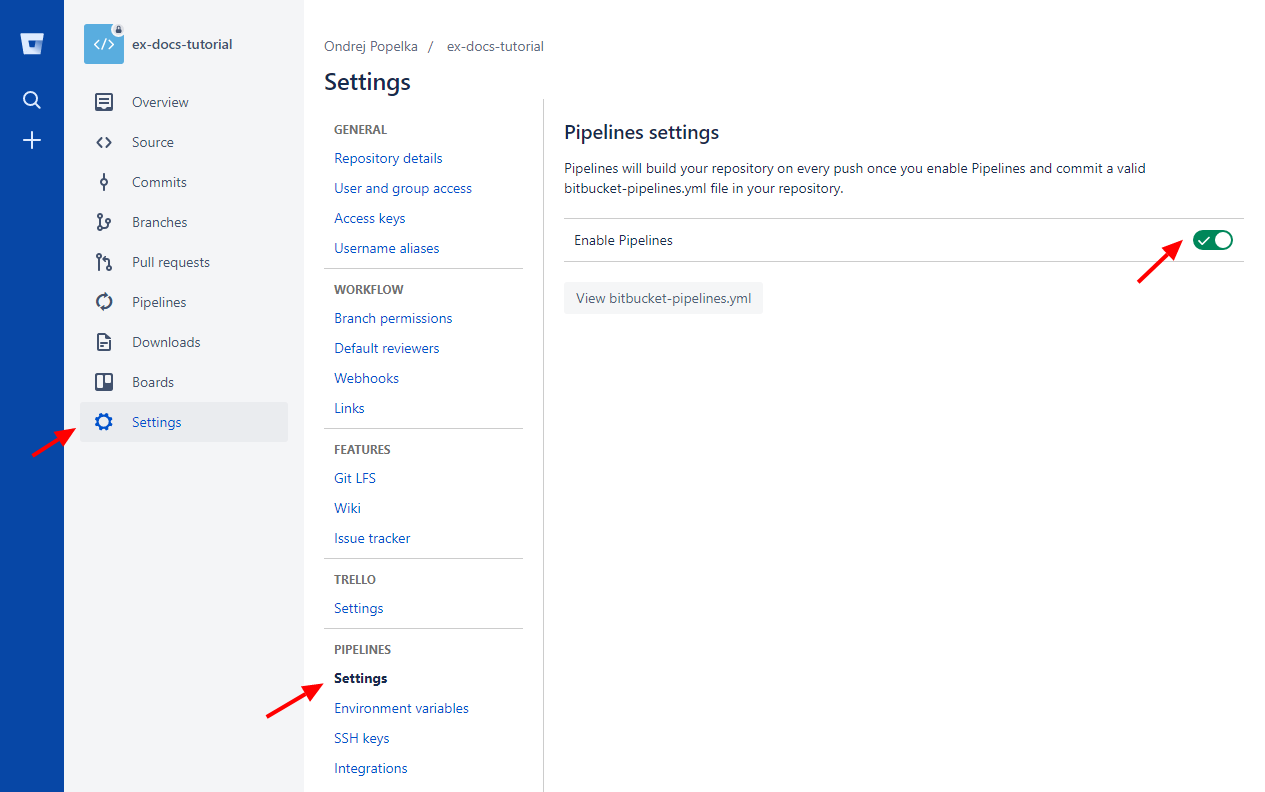
Note that only the owner of the repository can enable pipelines. Then set the environment variables in settings:
Add the following bitbucket-pipelines.yml file to your repository:
options:
  docker: true

pipelines:
  default:
    - step:
        script:
          - export APP_IMAGE=keboola-component
          - docker build . --tag=$APP_IMAGE
          - docker images

  tags:
    '*':
      - step:
          script:
          - export APP_IMAGE=keboola-component
          - docker build . --tag=$APP_IMAGE
          - docker images
          - ./deploy.sh
Also add the deploy.sh script,
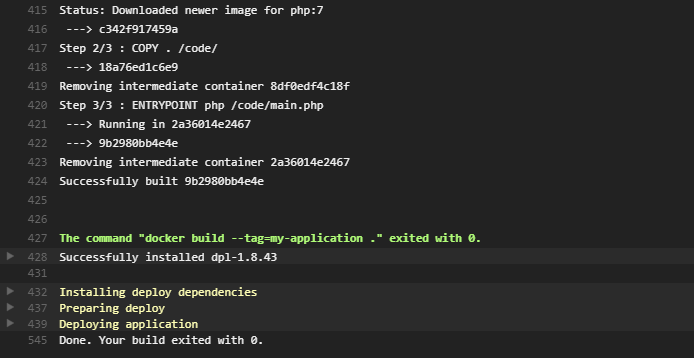
which is modified to use the BITBUCKET_TAG variable (instead of TRAVIS_TAG). When done, commit and push; a build will automatically appear in the Pipelines section:
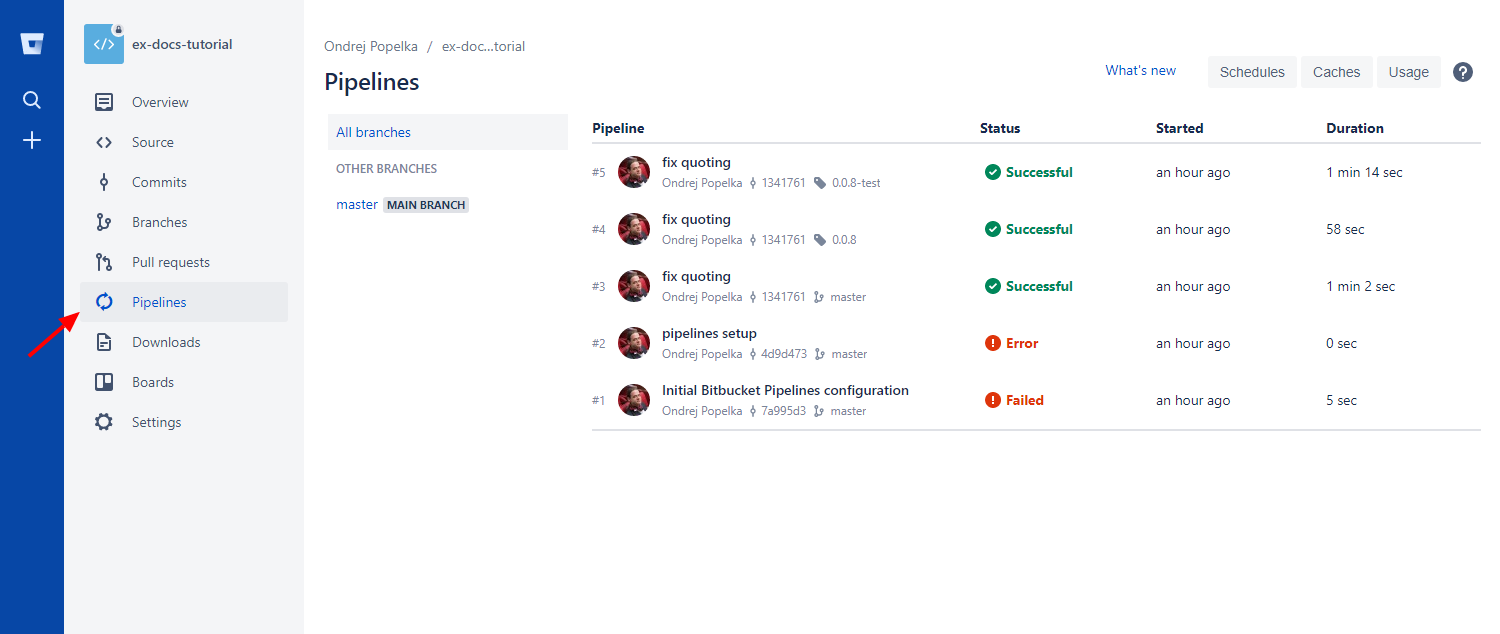
With the above settings, the Bitbucket Pipelines will behave in exactly the same way as the Travis configuration described above. You can also have a look at a 10 minute video showing the Bitbucket setup on a new component.
GitLab Integration
The development tutorial as well as the above description assume you’re using Travis CI Service for building and deploying the image. Travis integrates very well with GitHub, but not with GitLab. However, GitLab has its own continuous integration service – CI Pipelines.
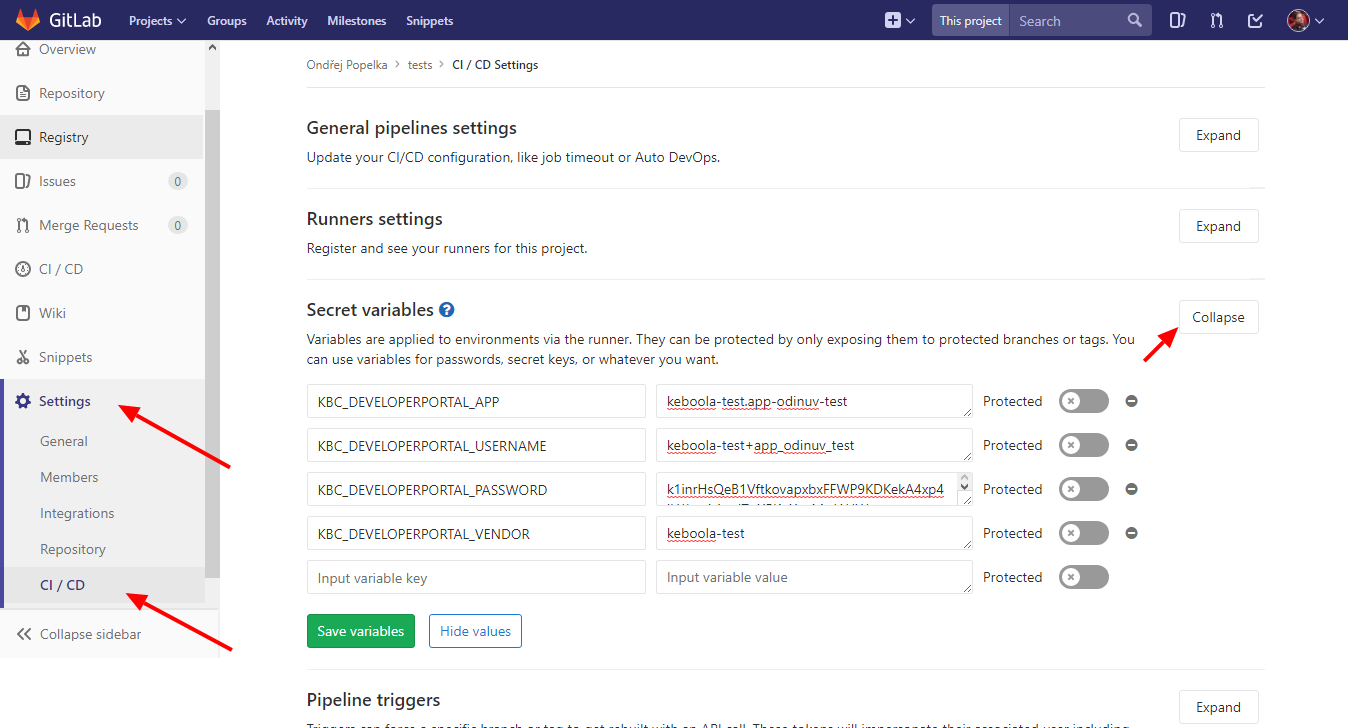
You have to set the environment variables in settings:
Then add the following .gitlab-ci.yml file to your repository:
image: docker:latest

variables:
  DOCKER_DRIVER: overlay2
  APP_IMAGE: keboola-component

services:
- docker:dind

before_script:
- docker info

build-component:
  stage: build
  script:
    - docker build . --tag=$APP_IMAGE

deploy-component:
  stage: deploy
  script:
    - docker build . --tag=$APP_IMAGE
    - pwd
    - ls -la
    - export
    - ./deploy.sh
  only:
    - tags
Also add the deploy.sh script,
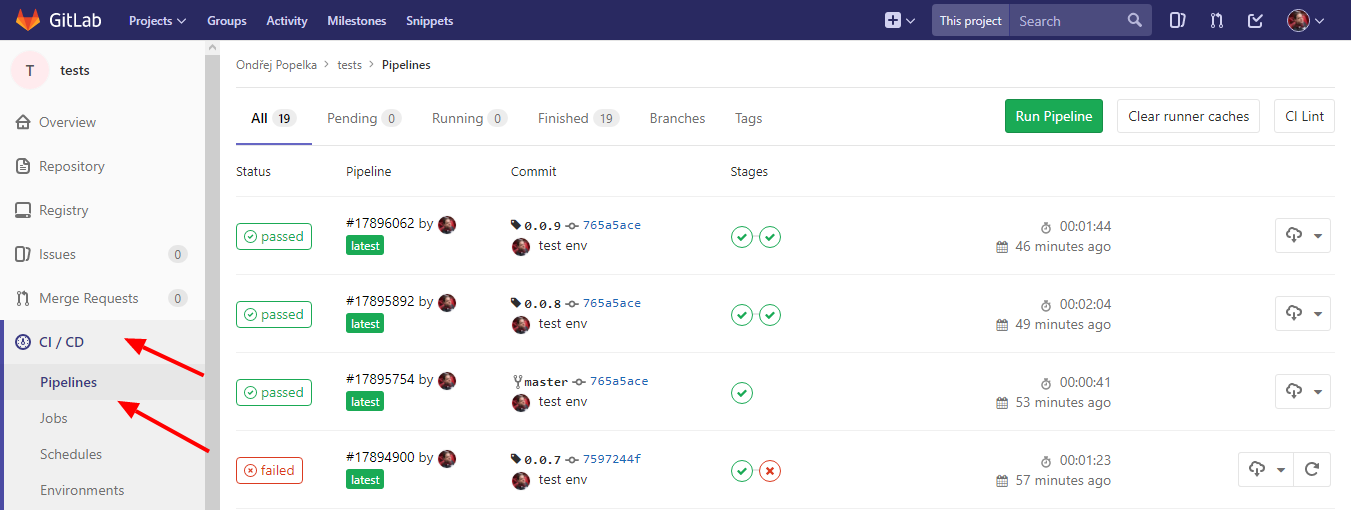
which is modified to use the CI_COMMIT_TAG (instead of TRAVIS_TAG) and use sh shell (instead of bash). When done, commit and push; a build will automatically appear in the Pipelines section:
With the above settings, the GitLab CI Pipelines will behave in exactly the same way as the Travis configuration described above. You can also have a look at a 10 minute video showing the GitLab setup on a new component.
Manual Deployment
If you want to use another continuous integration setting or deploy to the repository manually, you can do so without limitations. As in the above script, we recommend using the Developer Portal CLI client. This CLI tool (runnable in Docker or PHP) allows you to obtain the repository for a component and push credentials to that repository. See the chapter about running components, for example, how to obtain the AWS registry credentials. If you want to get even more low level, you can use the Developer Portal API directly. It also allows you to generate credentials for a service account programmatically. We use our AWS ECR registry for hosting all component images.
Test Live Configurations
Testing your component can be simply added as part of the script in .travis.yml file. See an example in
Python or
PHP.
However, you may want to test the component on some ‘real’ configurations in your project. You can do this by extending the build script and adding certain environment variables to Travis with an appropriate Storage token and configuration ID. It is highly recommended to create a dedicated token for this task.
The commands will need two extra environment variables apart from the ones listed above:
KBC_STORAGE_TOKEN— the Storage token that the test(s) will run underKBC_APP_TEST_CONFIG— the ID of the configuration to test
If you are still using our sample component code, create a configuration and set an arbitrary table on input.
The following extended .travis.yml will do the trick:
sudo: false

services:
  - docker

before_script:
  - export APP_IMAGE=keboola-component
  - docker build -t $APP_IMAGE .
  - docker run $APP_IMAGE flake8
  - docker run $APP_IMAGE python -m unittest discover
  # push test image to ECR
  - docker pull quay.io/keboola/developer-portal-cli-v2:latest
  - export REPOSITORY=`docker run --rm -e KBC_DEVELOPERPORTAL_USERNAME -e KBC_DEVELOPERPORTAL_PASSWORD -e KBC_DEVELOPERPORTAL_URL quay.io/keboola/developer-portal-cli-v2:latest ecr:get-repository $KBC_DEVELOPERPORTAL_VENDOR $KBC_DEVELOPERPORTAL_APP`
  - docker tag $APP_IMAGE:latest $REPOSITORY:test
  - eval $(docker run --rm -e KBC_DEVELOPERPORTAL_USERNAME -e KBC_DEVELOPERPORTAL_PASSWORD -e KBC_DEVELOPERPORTAL_URL quay.io/keboola/developer-portal-cli-v2:latest ecr:get-login $KBC_DEVELOPERPORTAL_VENDOR $KBC_DEVELOPERPORTAL_APP)
  - docker push $REPOSITORY:test

script:
  - curl --location --request POST "https://queue.keboola.com/jobs" --header "X-StorageApi-Token:$KBC_STORAGE_TOKEN" --header "Content-Type:application/json" --data-raw '{"component":"'"$KBC_DEVELOPERPORTAL_APP"'","config":"'"$KBC_APP_TEST_CONFIG"'","tag":"test","mode":"run"}'

after_success:
  - docker images

deploy:
  provider: script
  skip_cleanup: true
  script: "./deploy.sh"
  on:
    tags: true
The commands above
- build the component image and tag it
keboola-component. - run the flake8 code style check.
- run unittest tests.
- pull the Developer Portal CLI client.
- get the component’s Keboola registry from the Developer Portal and store it in the
REPOSITORYvariable. - tag the image as
test. - get the command to login to the registry (
ecr:get-login) and execute it (i.e., log in). - push the image to the registry.
- run the specified test job on Keboola using the Queue API. The tag used is
test.
If you want to run multiple test jobs, simply repeat the command with the different configuration IDs that you would like to test.
When you commit to the component repository, the Docker image will be built, and using a test tag, it will be tested in production Keboola.
However, it will not be deployed to production! To get it into production, create a new normal version tag (x.y.z) in the repository.
The Docker image will be built and tested using the test tag, and if all succeeds, it will be deployed
with the x.y.z tag into Keboola — a new version will be available in production.
You can see the Python code or
PHP code in our
Templates repository.